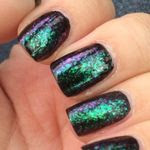
 |
| Photo courtesy of Nail Rock |
Let's be honest. Nail decals are awesome, but they require some serious patience to get the right size in the right location. I am not patient. I was super excited to try Nail Rock's line of designer nail wraps. The concept is pretty simple. Not only do they include a little paper in your package (in 4 different languages), it's also on their website:
how to nail rock
1. Push back cuticle.
2. Shape and file the nail edge.
3. Gently remove surface shine using a nail buffer or a smooth nail file.
4. Clean the nail using an acetone based remover.
5. Select the Nail Rock wrap nearest to your cuticle size. These can be trimmed to fit if needed.
6. Do not touch the adhesive side of the wrap that will be used on your nail.
7. Place at the cuticle edge and press FIRMLY on to the nail. Work from the cuticle edge applying pressure and smoothing the wrap from the middle to the outside edges of the nail.
8. If you have any creases, lift wrap slightly and stretch back over the nail. Apply pressure and smooth again.
9. Stretch firmly over the free edge of your nail and use your nail or a wooden hoof stick to tuck under the free edge.
10. Taking a smooth nail file, remove excess wrap by running file under the nail.
With a little practice, careful removal of shine from the nail and plenty of firm pressure, you will acquire a stunning, long lasting finish.
TO REMOVE
Starting from the nail edge, peel off the Nail Rock.
They even have a video on their YouTube!
However I had problems from step 5 ... on.
For starters, the wraps are on a white background sticker sheet and the edges are not where your cuticle is so you really have to guess on the size. A clear background or having no free edge of the sheet would be much better. You can see what I mean below in the picture I took of Metallic Gold.
 |
| Are you following PolishGalore on Instagram yet? |
I had just chopped my nails so I had very little free edge to my nails. Unfortunately, this also made it super hard for me to wear this product, as you have to stretch the wrap over your nails and tuck it under your free edge a bit before filing off the excess.
Instead, my wraps just basically tore. Consistently
No free edge to tuck my edges under.
Not only did I file too much and now my natural nail is showing but I also placed the wrap too close to my skin and didn't get it to lay down on the edges.
You can see again how they tore off instead of having a free edge to wrap under.
Ahhh the claw pose!
Yeah, I failed this one.
So I definitely want to try again with (a) more patience, (b) more of a free edge to my nails, and (c) properly preparing my nail for the wrap. I will try this again and let you know! It wasn't that the nail wraps were bad, it's that this user has a lot of error! With so many different designs to choose from, I definitely am willing and wanting to try these again for the price and ease.
Nail Rock [Website] [Facebook] [Twitter] [YouTube] is available on their website or at Nordstrom. The price ranges from $8 to $10 depending on where you're purchasing from. They have a variety of styles to choose from - metallics, nail art, and more!
Disclosure: The product[s] in this post was [were] provided to me by the company for consideration. For more information, please read this post.


