Press Sample
So I'm still getting my a/c fixed ... turns out I had a ton of wood rot and it's a miracle that the unit didn't fall through the cabinet and onto the floor. Because I'm literally stuck at home, I figured today was a great day to review the KBShimmer x Color4Nails exclusive polishes that I received from Color4Nails. These two beauties are What the Shell, a tan polish with micro pink glitter and micro rainbow glitter (which gives is a scattered holo look), and Berried In The Sand, a holographic fuchsia with blue shimmer.
First up is What the Shell.
So this color was so my jam in the bottle. I love the tan base, the pink shimmer, the scattered rainbow glitter. The rainbow glitter is what's throwing the orange and yellows you see in the bottle. I used a base coat of Duri Rejuvacote, 2 coats of polish and finished with KBShimmer Clearly On Top. I wasn't sure if 2 coats was enough and almost added a third, but KBShimmers are normally always opaque in two.
So on the nail was a different story. Even my husband, who's normally very disinterested in polish, said said "Eh, I don't like that." It just seemed to go too much into my skin tone and the rainbow glitter is pretty hidden on the nail. I mostly just saw pink shimmer. I think it's a pretty polish and VERY unique, but may look better on a different skin tone.
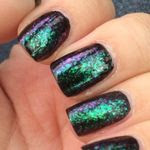
Next up is Berried In The Sand.
This is a holographic fuchsia polish with blue shimmer. I originally wore this on my nails before I nubbinized them, but didn't take an official photos. Then I made the big chop and decided to take photos. I used a base coat of Duri Rejuvacote, ONE COAT of polish and finished with KBShimmer Clearly On Top.
I was shocked that it was one coat. Absolutely shocked. So in love. I'm using this for my pedicure as well. This photo was taken outside in the sun so you can see the holographic vs the blue shimmer but in the shade the blue shimmer is apparent. I love it all. Definitely my pick to be worn again and again.
These two polishes are exclusive to Color4Nails and can be purchased for $10 each.
KBShimmer [website] can be purchased through their website for those in the United States and through Harlow and Co for international sales. Prices range from $5.50 to $8.75. Connect with KBShimmer through their social media networks: Facebook, Twitter, Instagram and Pinterest.
Disclosure:
The product[s] in this post was [were] provided to me by the company
for consideration. For more information, please read this post.
At Cosmoprof North America, I found out that Color Club was going into the stamping business - and boy were they ever! Launching over 40 plates out of the gate, they mean business. Also while at Cosmoprof, I was blessed to meet the husband and wife duo behind the stockist site Color4Nails. This posting will be about the Color Club Stamping Plates but they were provided to me via Color4Nails.
Side note, Color4Nails is a small home business that was founded in 2011. Their goal is to offer unique polish from different counties as well as from independent polish makers. What I really love is that they have some amazing collaboration polishes only available on their website but we will talk more about that later.
The above 3 plates are the ones I received from Color4Nails. Since they were a press sample, I cannot speak to the ease of purchasing through the website, but I was happy that they were well packaged. I had received 2 bottles of nail polish as well and they were also well packaged. If you've been reading PolishGalore for some time, you may recall another stockist/beauty website that sent me a horribly "wrapped" package, so it's important to me that things are properly packaged.
The first plate I used was the Color Club Sixties plate. First, take off the protective plastic from the plate. Apply your desired polish to the plate, remove excess with a scraper, use your stamper, and apply it to your nail. Since this was my first try, I decided to use 4 different designs.
The plates are gold in color and the outer white area is a plastic attachment that keeps you from banging the plate's edge. To keep it clean, I scraped towards the plate instead of off the edge.
For reference, I used a base manicure of LVX "Vanilla". I used Digital Nails "Questionable Browser History" which is a liquid latex masking fluid to cover around my cuticles so I didn't have to clean up as much. For stamping, I used CND Creative Play in "Red-Y To Roll", "Royalista" and "Isn't She Grape". For top coat, I used CND Creative Play top coat. My scraper and clear stamper were from UberChic.
So I'm pretty impressed with the pick up of each stamp. The designs are all well etched inside. The smearing you see is from my top coat. I have to now rummage through my box to find one that doesn't smear. I had also attempted Digital Nails "Ain't Nobody Got Time For That" top coat (smeared) and Anonymous Lacquer "With A Quickness" top coat (smeared) and this was a good 5 minutes after stamping. There's also the possibility that CND Creative Play isn't a great stamping polish. It's made to be a lacquer, and is not branded as a stamping polish.
The second plate I used was called Illusion. I used a base manicure of Glisten & Glow "Snorkel in St. Thomas". I used Digital Nails "Questionable Browser History" for my cuticles. For stamping, I used M Polish "I Need A Vacation" and LVX "Crimson". For top coat, I used Love Angeline "Topped With Love". My scraper and clear stamper were from UberChic.
LVX is used on my index and pinkie, M Polish is on my ring and middle fingers. M Polish is an actual stamping polish and you can see how it works beautifully. LVX also works but it's not as crisp. I actually had a really hard time with this plate picking up images the first time. I don't know if it's a combination of my stamper and polish or what. It looks etched just as well as the Sixties plate, so I'm not sure what's going on but I really love the different designs available.
The final plate I received was Food and this was the one that I felt was the most detailed by far. Sadly, it's also the one I had the absolute hardest with. Granted, I'm still very novice when it comes to stamping, so it may just be all that. I also want to try another stamper in the future. I used a base manicure of Dermelect Explosive. I used Digital Nails Questionable Browser History for my cuticles. For stamping, I used M Polish "Pish Plashin' Around", CND Creative Play "Red-Y To Roll" and "Isn't She Grape?" and LVX "Mink". For top coat, I used Love Angeline "Topped With Love". My scraper and clear stamper were from UberChic.
Not going to lie, I feel like a major failure right now with this last plate. I tried a double stamp on my ring finger and that just looks like mud. My index refused to take up the image. The words are a mess on my middle finger. The only one that came out half decent is my pinkie. I think my base manicure probably wasn't the best idea either. I should have gone with something more neutral.
Overall I think these plates are really nice - well etched, durable and lots to choose from. I don't feel totally defeated and want to look at picking up some more stamping polishes. M Polish is currently closed so I can't grab any more of hers but there are a couple more indie companies popping up and there's always Konad as well. I'm hoping Color Club comes out with a line as well.
You can purchase the Color Club Stamping Plates directly from Color4Nails here. Be sure to check out Color4Nails's social media on Facebook, Twitter and Instagram.
Disclosure: The product[s] in this post was [were] provided to me by the company for consideration. For more information, please read this post.