Showing posts with label black. Show all posts

LCN sharp as a bullet

Press Sample

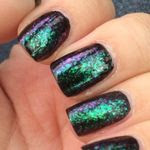
Happy Leap Year Day! Doing anything special or taking advantage of any special sales? I have work but I wanted to be a little adventurous with my nails. I had to go back to nubs because I ended up cracking one nail and splitting another and I just said "BYE FELICIA". Today I have LCN sharp as a bullet from the Industrial Innocence collection. As you can see from the printed sticker on the cap, this is a "matt" (matte) effect polish.

I used a base coat of Duri Rejuvacote and 3 coats of polish. Be careful with matte polishes because thin coats is best. I ended up rushing my last coat and ended up putting two large dings in my nails as soon as I put down my camera. For staying power, add your top coat, let dry and then add one more thin coat of polish to keep the matte effect.

No formula issues other than my heavy handedness on the last coat. This polish performs like most blacks. It does have a hint more grey than black in it which is apparent in the first coat of polish and in removal but on the nail, it looks like a nice satin black. 

I'm now halfway through the LCN Industrial Innocence collection and will finish posting them soon. Meanwhile, from now until March 31, 2016, you can purchase LCN on their Boutique website with free shipping using the code INDUSTRIAL.

LCN is available in both 8 ml (shown) and 16 ml. You can purchase on their website - 8 ml is $7.50 and 16 ml is $14.00. Join the conversation on FacebookTwitterInstagramYouTube and Pinterest.

Disclosure: The product[s] in this post was [were] provided to me by the company for consideration.  For more information, please read this post.

ellagee Chronic Badass

Nothing To Disclose

One of my favorite parts of nail polish is meeting the people behind the blogs and behind the brands. Last November, I was able to meet up with a group of polish makers and lovers in Austin, Texas - including Laura, the owner and creator of ellagee polish.

Laura and I are both members of a club that no one wants to join - fibromyalgia. Laura's is more advanced than mine but we can both relate to the constant and irritating pain, exhaustion and frustration of this very misunderstood chronic illness. 

Chronic Badass is the ellagee half of this "Fi-bros For Life" collaboration box and is a clear base with black matte and holo glitter, black holo stars and butterflies in matte purple and silver holo. This polish was her collaboration with fellow Texan, polish maker, and lovely lady with fibromyalgia - Raphaelle from Digital Nails. 

I decided to use LVX Porcelaine for three fingers (creme white) and LVX Aster for one finger (creme purple) for my base coats and just used one dabbed coat of Chronic Badass. I topped all fingers with Digital Nails Ain't Nobody Got Time For That. The coverage was good but I did have to fish a bit for the butterflies that I used.

The stars wouldn't come out and play for me but you can see I got two butterflies with a little fishing.

Shade photo! You can really see the different glitters here - square, hexagonal, circle... And if you look super hard, you can see a black star near my middle finger inside the bottle.

Here's some indirect light as well. I'm really loving the lavender glitters but not against the purple. I think it's better over white.

You can purchase ellagee through her website. Prices range from $8 to $15.00 Join the conversation with her on Facebook, Instagram, Twitter, Pinterest and Tumblr.

Salon Perfect Cosmic Black

Press Sample 

Here's another twist on your typical black and white glitter - throw in some silver, add some bar glitter and today you have Salon Perfect Cosmic Black. I decided to layer one coat over my essie maincure using the dab method where you just dab the polish onto your nail and smooth out with one stroke from cuticle to tip. This helps minimize the spreading or removing of the glitter from your nail.

This also drives matte so I used a top coat of Digital Nails Ain't Nobody Got Time For That.

Just one coat! I'm impressed.

The ring finger has only one dabbed coat of glitter as well.

I'm not totally against this bar glitter even - it doesn't look at hairy as normal bar glitter does.

Salon Perfect [Website] [Facebook] [Twitter] [YouTube] is a collection of professional-quality lash, brow and nail products. Available exclusively at Walmart stores nationwide for $3.98 a bottle.

Disclosure: The product[s] in this post was [were] provided to me by the company for consideration.  For more information, please read this post.

Salon Perfect Loves Me, Loves Me Not

Press Sample 

Here's a weird twist on the normal black and white glitter - this is a pale pink and black glitter. When I saw Salon Perfect Loves Me, Love Me Not, I knew I had to have it for my collection.

I decided to add one coat over my existing manicure of In Love, and then on my ring finger, I put 2 coats of polish alone. This glitter dries matte.


I love the tiny glitter!


Indirect light - you can see the ring finger isn't opaque in 2 coats but I didn't really want to pack it on any more. Because the glitter is so tiny, it's hard to tell that it's pale pink and not white, but I promise it is.

Salon Perfect [Website] [Facebook] [Twitter] [YouTube] is a collection of professional-quality lash, brow and nail products. Available exclusively at Walmart stores nationwide for $3.98 a bottle.

Disclosure: The product[s] in this post was [were] provided to me by the company for consideration.  For more information, please read this post.

NOTD: 24 October 2013

Press Sample 

I finally updated my polish spreadsheet earlier this week when I couldn't sleep and realized I have a LOT of nail polish. Additionally, I have a lot of nail polish that I haven't worn. So a few nights ago I decided to just randomly grab a color and GO.

I had a base coat of Cult Nails Get It On when I decided to grab Morgan Taylor Bronzed & Beautiful, a metallic gold polish. I used two coats and realized metallic gold and I don't go well together. The polish was fantastic - great formula, didn't pool in my cuticles, nice opacity... but my skin tone and gold? Nah.

So I decided to add dots! I can do this. I used Morgan Taylor Lost In Paradise a beautiful Tiffany blue creme. I placed a drop of polish on a plastic nail wheel and dipped my essence dotting tool to add random dots on my ring finger. Okay, not bad - but I just wasn't feeling the dots. The blue didn't pop against the gold as well as I hoped. I topped my manicure with Cult Nails Wicked Fast and decided to sit awhile and think about what I could do when it hit me.

I have a tiny striper brush in my ORLY Instant Artist polish! Now this was apart of the Nail Art Society relaunch kit and it's a funky but awesome concept. The polish (or paint as they call it) is water based so if you mess up, you can just wipe it off with water. Oh yes, you heard me right. Also it's super opaque (which is SO RARE) and then it's a thin brush so you can really draw some lines. So I decided to draw lines around my dots and BAM a leopard mani that Snooki would be proud of.

I attempted to photograph this today but I learned that I've gone WAY too long without taking photos and just about every single one was blurry. Lame.  But I did get this.


Yay! I was actually really proud of this manicure. I was even able to paint my Cinderella hand with the accent too. That's saying something.

PS: Super cool random fact, this is my 1500 post on PolishGalore! Yay milestone!

Disclosure: The product[s] in this post was [were] provided to me by the company for consideration.  For more information, please read this post.

China Glaze Boo-gie Down


So maybe you remember the drama from last year's China Glaze Halloween collection. Long story short, the 3rd party graphic designer that was hired to make the box artwork ended up stealing a photo off DeviantArt and changing the colors. Well China Glaze fired the graphic designer (and who knows what else) and this year as a sign of good will, they worked with the original artist Abigail Larson for the box artwork. Abigail even got to sign the image which is in all beauty supply stores and I think that's really awesome.

When I saw these at Cosmoprof North America, all I wanted to do was hide them in my bag and run away. I'm such a sucker for glitter. When these arrived at my door, I decided to try Boo-Gie Down first. This multi-sized orange, black and white glitter needed a good base color so after looking in my stash, I decided on Electric Pineapple from the 2011 Summer Collection "Island Escape". I had a base coat of Rejuvacote, 2 coats of Electric Pineapple and then just one coat of Boo-Gie Down. I topped my nails with Cult Nails Wicked Fast to smooth out any glitter and add shine.

I had tried a new manicurist and she just didn't quite get my cuticles smoothed out so I apologize for them. I'm also working on keeping them oiled at all times so they look healthy and moisturized.  So here it is in the sun - you can see all the different glitters in there... small, medium and large (pointer) as well as bar glitter. Great mix for Halloween!

I tried using the glitter on its own for an accent nail but I feel like it just makes the nail look dirty - like you stuck your hand in salt and pepper. Otherwise, I'm in love.

This photo is indoors without flash. I'm still without a storm door so I'm trying to find good lighting in my house for photos. This was also taken with my PaS camera instead of my DSLR so it's all a learning curve up in here.

If I had to pick one polish out of this whole collection that's a MUST BUY, I'd say it this one. Definitely a big fan of the size of glitter and the appropriateness for Halloween. I'm seriously thinking about making this my Halloween manicure but with all fingers using Electric Pineapple instead of just 4 out of 5.

China Glaze [Website] [Facebook] [Twittercan be found online through several etailers, including my favorite Head2Toe BeautySally's Beauty Supply as well as TransDesign.

Disclosure: The product[s] in this post was [were] provided to me by the company for consideration.  For more information, please read this post.

Glitter Daze Summer Sprinkles


Glitter Daze [Website | Facebook | Pinterest | Instagram | tumblr]  is an indie line from my home state in Texas. I cannot believe I missed meeting the creator while at Cosmoprof North America Las Vegas this year but she made sure to shoot me an email and asked if she could send me a few bottles. As you know, I'm still learning about indies and while I have my favorites, I do like finding new brands.

Glitter Daze features two size options for her polishes - a full size 15 mL for $11-11.50 & mini 4 mL (shown above) for $5.00. I'm very impressed with her business. Not only does she offer two different sizes, but she also has her own base coat, her own top coat, her own cuticle sticks and a Subscription Box with 3 different levels and including only a 100 run Limited Edition full size polish.  Oh wait, there's more... she has apple blossom scented polish remover and hand "fizzies"! And she has international shipping available through stockists AND she has a rewards program on her website.  Deep breath.

I used a base coat of NYC Clear, 1 coat of polish and topped it with Digital Nails Ain't Nobody Got Time For That. On my ring finger, I used Golden Rose 38 to show this over a color.

Okay, so this is a glitter polish that has multicolored neon glitter with black and white microglitter all in a clear base. It looks like a super blended fruit salad which is suoer fun.

This is just one coat! I love that it's a clear base, no issues with bleeding.

I didn't have any issues with the glitter being curled or raised with just one top coat, so that's fab too.  This is like an awesome glitter bomb that I have no problems wearing far into winter. What cracks me up is that I would have never picked this normally in the bottle but I LOVE it on. So don't judge a polish by its bottle!  Truth!

Glitter Daze [Website | Facebook | Pinterest | Instagram | tumblr features two size options for her polishes - a full size 15 mL for $11-11.50 & mini 4 mL (shown above) for $5.00.

Disclosure: The product[s] in this post was [were] provided to me by the company for consideration.  For more information, please read this post.

Cirque Dark Horse

Today I have Cirque Dark Horse, a handmade nail polish that I heard about from another blogger. This is the name sake from the debut Dark Horse collection. Each bottle is B3 free and holds 0.45 oz / 13.2 ml of product. One thing I didn't know was that organic lavender and clary sage essential oils have been added for a subtle scent after the polish dries. This is a black glitter with rainbow microglitter. 

I used a base of LVX Livid for my ring and index finger and then 2 coats of Dark Horse on all fingers. This polish dries gritty and matte, so make sure you use additional top coat.


I definitely think this is a polish best worn over black as you can see my visible nail under the nails without a base black. I'm quite confused because when I saw Scrangie's post - she said she used 3 coats and it was pitch black. I'm wondering if the formula has changed or what.

Even here in the shade - I just don't see how this is build-able in three coats - but it was fun to wear!

Can you see that it's a top coat eater in this picture? I also had a bit of a problem keeping it on my nails and off my cuticles but I'm working on it.

Cirque [Facebook] can be purchased on its website for USA residents and their stockists page has international options. Dark Horse runs for $13.00 a bottle.

Ninja Polish Sticks 'n Stones

While I was at Cosmoprof North America Las Vegas, I got to meet the ninja creators behind Ninja Polish and they gave me this awesome gift bag that had goodies including Cover Band Sticks 'n Stones, which is very reminiscent of Lynnderella Connect The Dots.  I decided to layer it over my NCLA Dirty Martini manicure.  This is one (yes one!) coat of Sticks 'n Stones.

Check it out in the sun!  We have it all - bar shapes, small hexs, dots - oh yeah buddy.  Please ignore the hand written label - this was one of their first prototypes and the bottles for sale have the official labels on the bottom.

Shade picture!  Not much different - still see all the shapes and it looks awesome and dude, it's fantastic.

Indirect light!  Pow!  The major difference I can tell from this and the Lynn is that this does not have tiny microglitter running through the clear base.

Indoors with the flash - howdy.  I'm glitter.  I look cool.  Less people, you can't really go wrong with this polish.  

So where to buy?

BAM.  You can get it from Ninja Polish here for only $9.00.  Yes, nine dollars.  Win.  Go get it.  Ninja Polish: Website | Facebook | Twitter

(PS: I may or may not be watching Jenna Marbles on YouTube while blogging.)

(PSS: I MAY)

Disclosure: The product[s] in this post was [were] provided to me by the company for consideration.  For more information, please read this post.

LVX Livid

Continuing with LVX's summer line was Livid, a black creme that has its own shine.  I originally tried wearing this with one coat over longer nails but I found it a bit thin and ended up making a mess, so this weekend, I decided to retry this polish and give it more TLC.

I used a base coat of Rejuvacote, 2 coats of Livid and no top coat because I was surprised to see how shiny this polish really is on its own.  I am always keeping a bottle of black around my desk but hate matte blacks, so this was great.  I didn't need to clean up too much with careful application but the clean up I did need went away with just a little acetone on a brush.


Here it is in the sun and you can see all kinds of reflections from the sky and even my camera snuck into the picture!  So shiny!  Formula was very smooth as well, which I was pleased with.


Here in the shade, you can see how opaque two thin coats really are.  The green overcast on the bottle is actually the overhead trees.


Finally, I took a picture in indirect light and again - it's just like a mirror and you can see my camera in almost every picture.  While this is on the pricey side, it is definitely a good purchase for a quick, opaque black.

LVX [Website | Facebook | Twitter | YouTube | Instagram] is available on their website. It is 10-free to include Toluene and Camphor, vegan and cruelty free. Use promo code POLISHGALORE for 20% off your purchase!

Disclosure: The product[s] in this post was [were] provided to me by the company for consideration.  For more information, please read this post.

Cult Nails Nevermore

Coming soon to Cult Nails - it's this amazing one coat black creme Nevermore!  This will be launching in September along with the 5 new "toppers" or color changing top coats that Maria hinted about back in May 2012.  Right now, you can sign up for Gloss 48 for free and get 3 of the new toppers as well as many of your other Cult Nails favorites for only $7.  Fortunately, Nevermore is one of the colors on sale right now, so I have to show you how awesome this is.  

I used a base of Cult Nails Get It On, one coat of Nevermore and no top coat.  Yes, I have Cult Nails Wicked Fast but frankly, you don't need it.  Maria put something magical into this polish so that it dries to a super shiny finish - not rubbery, not matte, no shimmer... perfect.  While I love my cheap Sephora black, it's hard to find.  I love my CND Blackjack, but it's also hard to find.  Cult Nails?  Shop online and shipped with reusable cotton balls for packaging?  Fun times.


I have to apologize for the far away photos.  I was using my DSL camera to try and get some good pictures for Gloss 48, and well - I still need to learn how to use it.  Plus I want to buy a macro lens and well - I need to save some pennies up for that one (like 30,000 of them).


Look how amazingly shiny this polish is!  And opaque?  Oh yeah buddy.


To consistently have a one coat black creme for just $10?  Sold.  I'm sure this will be the second polish that I use until it's empty (the first being my CND Blackjack).  Love love love!  I'm a Cultie!

For your first look at the Color Altering Top Coats, please check out the post here written by moi on The Glossy Pages.  I'll be writing about them too but check it out on Gloss48... the sale only lasts until August 31st!

Cult Nails [Website | Facebook | Twitter | Blog | Instagram: CultNails] is available in their shop for $12 a bottle.

Disclosure: The product[s] in this post was [were] provided to me by the company for consideration.  For more information, please read this post.

CND Crimson Sparkle

I absolutely love the CND effects line, which I know I've said several times.  Now you may notice, that my bottle is stained red at the bottom and the label is all over the place - it was stained totally red but I tweaked it so you can at least read it.  Crimson Sparkle is a red shimmer inside of a clear base.  I used my existing Desert Suede manicure for this effect, except for my index finger, which I put a coat of black on.  This is just 1 coat of Crimson Sparkle with a top coat of CND Air Dry.


Boo cloudy weather.  What I love about Crimson Sparkle is that it's subtle and jam packed at the same time.  Obviously, over a nude, it's not going to give much punch.  You can see it, which is great for some office action but look at it over black!  I love that it almost takes on a duochrome with gold at the edges and crimson red at the tips.  Lovely.


Kind of the same story in the shade.  I really should have just picked a different base color but at the same time, I love how you can have an office appropriate nude and play it up with some sparkle.  :]


Finally here's this crazy flash shot... the camera didn't want to focus on anything.  So do you need this color?  Yes.  But then again, I'll say that about every single CND effects I have.  :]  Oh yes.


CND is available for $9 per colour, and $11 per effect and you can find locations to buy here.

Disclosure: The product[s] in this post was [were] provided to me by the company for consideration.  For more information, please read this post.

NOTDs Posts

While I work on cranking out some awesome new polishes from brands like NCLA and Jesse's Girl Cosmetics, I wanted to share some of the recent "Nails of the Day" posts that I've been wearing to work.


7 March:  I wish I remembered what these color were.  I know that the white was a China Glaze older color and the pink was an OPI color.  I really don't care for French manicures but I was on my way to a job interview and needed something quick and classic.  It was cured with Seche Ultra V - UV Activated Top Coat and an older CND UV lamp.  I had this done by my manicurist locally who shapes my nails & cleans up my cuticles.


12 March:  I don't remember what hot pink I used here as a base (this is why I write things down normally!) but the glitter tips was from Mattése Elite Mon Amour.  You'll see a review of that later - promise!


18 March:  Here is butterLONDON Knackered which I had a hard time buying when I saw it on blogs.  No one seemed to show it in the best light - and honestly I don't feel like I am either.  I layered this over one coat of Sephora black (the general small bottles that they sell - I got mine for $1).  I really do love all that's going on here - the multichromed purple and green, the microglitter that almost seems holographic.  Love.


19 March:  From the Capitol Colours collection, China Glaze Fast Track was a great office nude with just a hint of shimmer from the microglitter particles.  You'll see a full review on this later.


20 March:  I bought a gram of SpectraFlair pigment from PaisleyPolish1 on Etsy.  Unfortunately, I apparently bought her last gram because the shop is currently closed.  I put about 4 small spoonfuls (using a nail stick) into a half bottle of Seche Vite, added some thinner (because my Seche was getting thick) and some BB ballz to be able to shake the mix up.  I'll have more of a post later but this is 1 coat of the SpectraFlair top coat over China Glaze Sea Spray.


23 March:  I'm really happy and excited about this manicure.  I used a base coat of Sephora black and then 2 coats of Shades of the Season "white" - a color that I picked up from cvs/Pharmacy over the winter break.  It was in a big tube of polishes and as you can see, the glitter shows up either as green or blue depending on the light.


26 March:  I can't believe I've never done a post on Cult Nails Iconic!  I've had it forever but just hadn't put it on.  The flakes get a bit lost in the red base, but it was still a great manicure.


29 March:  Finally I have the new JulieG Gelato in Venice, the new line of nail polish from Jesse's Girl Cosmetics.  This is a mint green creme that reminds me a lot of mint chocolate chip (minus the chocolate chips!).  Oddly enough I only had gelato once in Venice but it wasn't mint - I think it was strawberry.


1 April:  While opening the dryer to get my sheets out, I did this.  Granted this is my right hand but my nails have been getting in the way of my typing and other daily activities so super nubbins I go.


I haven't decided what color to put on my super nubbins but I'm almost thinking of neon.  Neon and nubbins work for me.  :]


Hope you've enjoyed my NOTD!  If you follow me on Instagram (PolishGalore), you've seen all these already, and sometimes I post them on Twitter as well!  :]


Disclosure: The product[s] in this post was [were] provided to me by the company for consideration.  For more information, please read this post.