Showing posts with label nail art. Show all posts

Tweexy Hinge

Press Sample

Remember the wearable tweexy? I reviewed it back in 2016 but now they are back with a new product - Hinge. This is also a silicone nail polish holder but can sit on any smooth surface instead of attaching to your hand.

Sculpted by GG - Kingsville, Texas

Image courtesy of Sculpted_by_gg

Nothing To Disclose

My nails have been a WRECK. March was so unbelievably busy with work, kids, and life in general. It's been hard finding time to get my natural manicures in and I have been going from location to location, trying to find one that works with my time, budget, and standards.

Blue and Gold Nails

Press Sample

HOW do people use their iPhones for amazing photos? Because y'all - I can't figure it out. I got a hohem iSteady X for Christmas and I haven't had the energy to open it but I did today because well, I did these nails on Wednesday of last week and so my grow out is - well, you can see it.

H&E Paint Bar, Portland Maine


Hello dear friends! I took a nice long break for my health (still battling long-hauler COVID-19 issues) and then a long vacation to see my husband's family in Maine. While I was up there, I had toyed with the idea of getting my nails done but I had broken one on the plane and was just in a funk over color, shape and design.

Red Glitter Nails with Morgan Taylor & F.U.N Lacquer

Press Sample Nothing To Disclose

This weekend, I attended my first ADDY's & Big Wigs award show for the American Advertising Federation. I was in a room of MY PEOPLE and it was so much fun. The theme was "jewel toned" so I wanted to really rock a good nail look.

Sally Hansen Salon Chrome Rose Gold

Press Sample

Sally Hansen has been stepping up their nail art game so I was excited when they came out with Chrome Powders for consumer use. I've also been on a huge rose gold kick for the past several months so I was all over this kit.

Roaring 20s Manicure!

Press Sample

Happy 2018! Did you do anything fun on New Year's Eve? This year, we had a Roaring 20's party at work and originally I hadn't planned on getting dressed up but then something sparked in me and thank you Amazon Prime - I got all glammed up.

Color Club Stamping Plates


At Cosmoprof North America, I found out that Color Club was going into the stamping business - and boy were they ever! Launching over 40 plates out of the gate, they mean business. Also while at Cosmoprof, I was blessed to meet the husband and wife duo behind the stockist site Color4Nails. This posting will be about the Color Club Stamping Plates but they were provided to me via Color4Nails.

Side note, Color4Nails is a small home business that was founded in 2011. Their goal is to offer unique polish from different counties as well as from independent polish makers. What I really love is that they have some amazing collaboration polishes only available on their website but we will talk more about that later.

The above 3 plates are the ones I received from Color4Nails. Since they were a press sample, I cannot speak to the ease of purchasing through the website, but I was happy that they were well packaged. I had received 2 bottles of nail polish as well and they were also well packaged. If you've been reading PolishGalore for some time, you may recall another stockist/beauty website that sent me a horribly "wrapped" package, so it's important to me that things are properly packaged.


The first plate I used was the Color Club Sixties plate. First, take off the protective plastic from the plate. Apply your desired polish to the plate, remove excess with a scraper, use your stamper, and apply it to your nail. Since this was my first try, I decided to use 4 different designs.

The plates are gold in color and the outer white area is a plastic attachment that keeps you from banging the plate's edge. To keep it clean, I scraped towards the plate instead of off the edge.

For reference, I used a base manicure of LVX "Vanilla". I used Digital Nails "Questionable Browser History" which is a liquid latex masking fluid to cover around my cuticles so I didn't have to clean up as much. For stamping, I used CND Creative Play in "Red-Y To Roll", "Royalista" and "Isn't She Grape". For top coat, I used CND Creative Play top coat. My scraper and clear stamper were from UberChic.


So I'm pretty impressed with the pick up of each stamp. The designs are all well etched inside. The smearing you see is from my top coat. I have to now rummage through my box to find one that doesn't smear. I had also attempted Digital Nails "Ain't Nobody Got Time For That" top coat (smeared) and Anonymous Lacquer "With A Quickness" top coat (smeared) and this was a good 5 minutes after stamping. There's also the possibility that CND Creative Play isn't a great stamping polish. It's made to be a lacquer, and is not branded as a stamping polish.


The second plate I used was called Illusion. I used a base manicure of Glisten & Glow "Snorkel in St. Thomas". I used Digital Nails "Questionable Browser History" for my cuticles. For stamping, I used M Polish "I Need A Vacation" and LVX "Crimson". For top coat, I used Love Angeline "Topped With Love". My scraper and clear stamper were from UberChic.


LVX is used on my index and pinkie, M Polish is on my ring and middle fingers. M Polish is an actual stamping polish and you can see how it works beautifully. LVX also works but it's not as crisp. I actually had a really hard time with this plate picking up images the first time. I don't know if it's a combination of my stamper and polish or what. It looks etched just as well as the Sixties plate, so I'm not sure what's going on but I really love the different designs available.


The final plate I received was Food and this was the one that I felt was the most detailed by far. Sadly, it's also the one I had the absolute hardest with. Granted, I'm still very novice when it comes to stamping, so it may just be all that. I also want to try another stamper in the future.  I used a base manicure of Dermelect Explosive. I used Digital Nails Questionable Browser History for my cuticles. For stamping, I used M Polish "Pish Plashin' Around", CND Creative Play "Red-Y To Roll" and "Isn't She Grape?" and LVX "Mink". For top coat, I used Love Angeline "Topped With Love". My scraper and clear stamper were from UberChic.


Not going to lie, I feel like a major failure right now with this last plate. I tried a double stamp on my ring finger and that just looks like mud. My index refused to take up the image. The words are a mess on my middle finger. The only one that came out half decent is my pinkie. I think my base manicure probably wasn't the best idea either. I should have gone with something more neutral. 

Overall I think these plates are really nice - well etched, durable and lots to choose from. I don't feel totally defeated and want to look at picking up some more stamping polishes. M Polish is currently closed so I can't grab any more of hers but there are a couple more indie companies popping up and there's always Konad as well. I'm hoping Color Club comes out with a line as well.

You can purchase the Color Club Stamping Plates directly from Color4Nails here. Be sure to check out Color4Nails's social media on Facebook, Twitter and Instagram.

Disclosure: The product[s] in this post was [were] provided to me by the company for consideration. For more information, please read this post.

Memorial Day 2016 Nail Art featuring UNO by Gelish MINI

Press Sample

If you've been reading PolishGalore for any length of time, you'll know that I'm pretty terrible when it comes to nail art. I love the look, I love the creativity, I just don't have "it" when it comes to creating half the time. That's why when I got these new UNO by Gelish MINI 1-step soak off gels, I knew that I could probably create something awesome for Memorial Day using vinyls. Let's see what happens, right?

UNO by Gelish MINI is a single-step process for DIY gel manicures. That's right, no base coat, no top coat, and no cleansing involved. Just get an LED light and your choice of over 20 colors and get to work. These durable, high-shine manicures boast a 7-10 day wear time, providing you wrap your tips, keep the gel off your cuticles, and use thin coats when applying. Please do not confuse "1 Step" with "1 Coat". 

Side note: Do not use a LED lamp that has more than 18 watts. I have absolutely no idea the wattage on my LED lamp but it seemed to work fine with my nails.

First, as with any manicure (gel or not), I properly cleansed my nail, removing all my old nail polish, and making sure my cuticles were off the nail plate. Next was prepping the gel bottle - this doesn't sound like much but you do need to shake the bottle to make sure all the product is properly mixed, as gel tends to be thicker than normal polish. Then I started with one thin coat of the red creme called Traffic Stopper and cured in my LED lamp (60 seconds). Then I added a second thin coat of Traffic Stopper and cured that for 60 seconds. Next, I used the Starburst vinyl from NailVinyls and placed it about halfway on my nail before using the blue creme called Very Blueberry and cured for another 60 seconds. Afterwards, I removed the vinyl and was good to go. Very Blueberry was pigmented enough that I didn't need a second coat.

Now the only downside about using a vinyl with a 1-step gel is that there isn't a top coat to "seal" the edges of the vinyl. My vinyl didn't lift or get caught on anything but at the same time, my nail wasn't as smooth as the others, so I made this an accent nail only. A top coat would have smoothed everything out but that would have defeated the purpose of using UNO.

To remove, start by gently filing the surface of the gel with a 180 grit file to remove the shine (the nail should look matte), then place a cotton ball with your choice of remover on the nail and wrap with foil. There are many different products on the market to help aid you in removing your gel - I prefer the Steam Off by Katie Cazorla. You still file the surface but then you place your hand in the machine for 10 minutes and the steam created from the acetone penetrates to the polish and steams it right off. I've been using it every time I wear gel, without any issues.

The final look! I wore this to a baseball game on Sunday and it lasted me well. I did not wrap my tips and because of it, I had tip wear after Monday's chores of washing dishes and doing laundry. I will be wearing more of the colors as this month goes on as June will be really busy for us and can't wait to show you more colors!

UNO by Gelish® MINI products are available exclusively at Sally Beauty Supply stores nationwide and online at sallybeauty.com for about $11.50 for a 5 mL/0.17 fl oz bottle. Follow Gelish® MINI on FacebookTwitterTumblr and on Instagram.

Disclosure: The product[s] in this post was [were] provided to me by the company for consideration.  For more information, please read this post.

M Polish: A Five Free Indie Stamping Polish!

Image provided by M Polish
Press Sample 

This spring, M Polish unveils one of the first independently created, hand mixed, cruelty free and Big-5 free stamping polishes to the nail art world. I am a stamping addict” says M Polish founder Megan Patituce.  I have a ton of stamping plates but I wanted the ability to make whatever color I wanted and have those colors be 5-free, because I know a lot of people are becoming increasingly concerned about what is in their polish.

Spring 2015 Collection: On February 17, 2015, M Polish launched their maiden Spring 2015 collection. This 6 piece collection consists of Apple Blossom (light pink), Apricot Delight (light orange), Bells of Ireland (mint green), Snowberry (pearly white), Starflower (cornflower blue), and Sweetclover (duochrome yellow-green). Polishes will be available in individual 11 mL (full size) bottles for $6.50 and 5 mL (mini) bottles for $3.25. Full collections will also be sold at $36.00 for full size and $18.00 for mini bottles.

How to Use: Stamping polish is used in coordination with stamping plates and stampers available from a variety of companies. Paint the stamping plate with the M Polish of your choice, lightly scrape the excess polish off with your stamping scraper, and roll your stamper onto the design. To transfer to the nail, roll the stamper across your nail for a crisp image. M Polishes are designed to work best over dark polish bases.

I was excited to try a few looks but I was super nervous because as you may remember, I'm not very good at nail art. But I was really determined to try!

M Polish Snowberry is a white stamping polish without any shimmer. I was super happy that it was opaque right away. I used a base polish of China Glaze Pop The Trunk from the Spring 2015 Road Trip Collection and used my Konad Plate m64.

CHECK THAT OUT! This was my first attempt at stamping in like... 3 years. Crisp. I was super impressed with how well the polishes picked up on the plate and laid down on the nail.

M Polish Apple Blossom is a light pink stamping polish without shimmer. I used a base polish of China Glaze Boho Blues from the Spring 2015 Road Trip Collection and stamped with my Konad plate m63.

I was really happy with this delicate design. I probably should have used a darker base color to really make it pop but it was still lovely.

M Polish Starflower is a light blue stamping polish with a slight inner glow but no shimmer. I used a base color of JulieG Sour Grape from the 2015 Jelly Beans collection and stamped with my Konad plate m51.

Look how this blue pops! 

M Polish has also launched a special, limited edition Mother's Day Duo called Mama Loves Polish Duo, available now until Mother's Day. The best part is that 50% of the proceeds will be donated to the Avon 39 "The Walk to End Breast Cancer" for Rebekah so you're supporting a great cause. The duo is available $13.50.

M Polish Annette is a coral pink. I used a base color of Love, Angeline Did You Say Peppercorn?! from the Chateau Macaron collection and stamped with my Konad plate m25.

I love how soft and delicate this looks while being able to pick up the entire image.

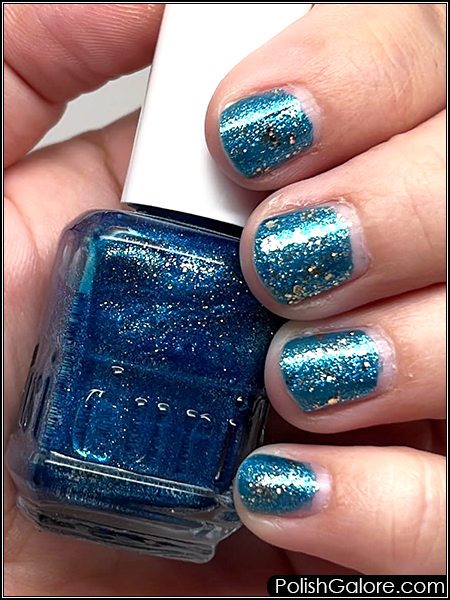
M Polish Sliver of Hope is a silver metallic stamping polish. I used a base color of LVX Turkoise from the Spring 2015 collection and stamped with my Konad plate s6

Look how opaque those squares are! Aces, M Polish, aces.

Notice that my water mark is a little different? That's because I was given the privilege to feature M Polish on Nail It online! Check out the article here.


M Polish already has a summer 2015 collection coming soon which I got to preview and let me tell you - it's going to knock your socks off. If you're looking for a great new indie company to support that specifically makes stamping polishes and is 5 free, here's your girl!

M Polish can be purchased at http://www.mpolishes.com with shipping to the USA and Canada.  Join the conversation! Facebook http://www.facebook.com/MPolishes & Instagram http://www.instagram.com/MPolishes

Disclosure: The product[s] in this post was [were] provided to me by the company for consideration.  For more information, please read this post.

Liquid Palisade by Kiesque

Press Sample 

Full disclosure - I am not the person to come to for nail art. I have very little patience, I have very little creativity. Anything I can use to make it easier, I am ALL for. That being said, when I first heard about Liquid Palisade by Kiesque back in 2013, I wanted to get some pretty badly. 

Think of it as painter's tape for nails. You brush on the purple liquid where you don't want polish, polish your nails, then remove the now dried protective barrier. Sounds great for gradients and water marbles, right?! However, as always, people smarter than I have even used it IN their nail art, painting designs on the nails with the Liquid Palisade, and painting, then removing the design. Think nail vinyls before we had nail vinyls.

Thankfully, this product is super easy to use - really doesn't take much effort or thought. I'm wearing Morgan Taylor Party At The Palace from the upcoming Cinderella collaboration collection and thought that I'd sponge over Morgan Taylor Watch Your Step, Sister! Now this is maybe the third gradient I've ever done so I'm still learning what colors go well together, how far up to sponge your gradient blah blah blah. My color theory isn't quite there yet - sorry art majors!

Krystal's mistake #1, not getting the Liquid Palisade isn't close enough to the cuticle. This winter I finally put together my new computer desk and monitor stand and then I had to replace my lamp. The lamp I replaced it with, is terrible. I simply do not have enough lighting anymore - and with a gloomy day outside, I don't have my natural light streaming in. I needed to get the Liquid Palisade a little closer to ensure that no polish was on the cuticles. As you can see, it paints on in a light purple and turns a darker purple (on the edges) as it dries. You should let it dry for about 30 seconds before starting your gradient or other nail art so that you don't get paint in your Liquid Palisade.

Now go crazy! I sponged my colors a total of three times and as you can see I got a little messy - should have probably added a bit more Liquid Palisade or been more careful around the edges.

Then just grab a corner of the dried purple Liquid Palisade using tweezers and peel cleanly off!

Enjoy your nail art!

So the bottle looks a little big, right? It's a 10 g/0.35 oz bottle of Liquid Palisade. To compare, Morgan Taylor has 0.50 fl oz in its bottle.
Basically it's tall but much skinnier. Think more of a striping brush. However, Kiesque says that you can get 50 manicures out of this one bottle. I'm not sure how they are measuring a manicure, but considering it's a little more than half of the Morgan Taylor bottle and I have never emptied a bottle of polish in my life from use, I'd say you have some wear time with this product.

The brush itself is quite thin, which is great for getting precise lines but less fun if you want to cover an entire area (like your entire first knuckle if you're doing a water marble. It is flexible enough to get into that little space between your nail and your cuticle but not so flexible that you're all over the place.
Additionally, the product is a bit stinky, being latex based. Make sure you use in a well ventilated area. Keep away from eyes and DO NOT USE if you have a latex allergy.

Now, I am fully aware that other bloggers have used Elmer's Glue, Liquid Latex (available online or at party supply stores) and even Sally's Hair Glue in place of Liquid Palisade. Indies are even getting into the mix like ellagee who is using a re-packaged material but in a familiar nail polish bottle and with a larger brush. Unfortunately, I have not tried any of them, so I can't confirm or deny any of the claims that they work just as well.

You can purchase Liquid Palisade directly from Kiesque on their website here for $22.00. It is also available on Gloss48 as well as a few international stockists too. Please see the Kiesque website for more. Join in the conversation with Liquid Palisade on Facebook, Twitter, Instagram, Pinterest and Google+.

Disclosure: The product[s] in this post was [were] provided to me by the company for consideration.  For more information, please read this post.

Chaos & Crocodiles Nail Art with Subterfuge & Sleeper Cell

Nothing To Disclose

I got to meet the sweetheart behind the indie brand Chaos & Crocodiles last summer in Vegas, and slightly before I went, I was lucky enough to get my hands on a pre-order of the Secret Agent Collection, a set of 10 holographic polishes that came in a gold-foiled cardboard box with a foam insert. Frankly, it was fantastic. 

In October, with my alma mater's Homecoming fast approaching, I decided to pull out Subterfuge (gold) and Sleeper Cell (blue) in a great homage to my school's colors. Now, since I'm not the best at nail art, I knew it had to be simple and what looks amazing but is simple? NAIL VINYLS!

I had received a bunch of nail vinyls from KBShimmer, so I chose a scalloped lines design and decided to just go crazy on my accent nail. Now because I was in a huge rush, I decided to top my nails with a gel top coat (cured in a LED lamp) which caused a little wrinkling but nothing terrible.

For Subterfuge and Sleeper Cell, I used 2 coats of polish for both.

HELLO HOLO. I was a huge fan of this manicure and ended up wearing it for days.

In the shade, the holo disappeared but at least you can see the scalloped design better (and the wrinkling).

Either way, I was a happy camper and will definitely be repeating this combination for Homecoming 2015. It helps that I live in the same town that I went to college in, hah!

Chaos & Crocodiles can be purchased on her website. Prices range from $10 to $12.50. You can like her on Facebook, follow on Twitter and follow on Instagram as well.

#IHeartCND Houston 2014


Today, CND held their "I ♥ CND" Event at Central Nails & Beauty Supply in Houston, Texas. Jan Arnold and the CND Education Ambassadors were on hand to demonstrate the CND Art Walk Summer and Fall 2014 looks featuring CND SHELLAC and VINYLUX. After the Art Walk, CND also held a SHELLAC Certification course for those looking to become a SHELLAC Certified Pro.

The CND Art Walk featured designs using the Summer 2014 "Paradise" Collection and the Fall 2014 "Modern Folklore" Collection as well as the Summer and Fall Additives.

My first two stations featured designs using the Fall 2014 Modern Folklore Collection and Additives to create regal fall nail art looks.


First, Education Ambassador Michele Huynh took me through the "Burnished Crest" nail that she created (far right nail in the above photo). She used SHELLAC but you can also use VINYLUX for this look. It includes using Additives for shimmer and small bullion beads for added flair. 
Michele Huynh

Next, Education Ambassador Shelena Robinson walked me through the incredibly beautiful and incredibly simple Modern Renaissance fall nail design (far left nail). She also used SHELLAC but again, VINYLUX could be used as well.
Shelena Robinson
Shelena is pictured here with the nails from The Blonds Fall 2014 Show that she designed. She crafted the guns from this iconic photo strictly by hand only using Retention+ Liquid and Powder. Crazy amazing.

Her own nails today were amazing too. She created a watercolor look using CND products.

Next on my Art Walk were looks created with the Summer 2014 Paradise Collection.

Educational Ambassador Heather Reynosa-Davis showed me how to create the middle nail "Blue Lagoon" using CND SHELLAC and nail foil. TIP: Allow your foil adhesive to dry to clear, then apply your foil. Apply too soon and the foil will be too wet and not apply properly.

Educational Ambassador Alfa Romero created a "Dragon Fruit" nail using Summer Additives in Sizzling Sand and Midnight Tide.

Next, Educational Ambassador Sylvia Palomino walked me through the entire LookBook, both available digitally and in hard copy, from the Fall 2014 season.

They even had the wall art that was created from the Spring 2014 season. Did you know that CND has been apart of Fashion Week for over 17 years?

Super exciting secret - I will be attending the Mercedes-Benz Spring 2015 Fashion Week next month! My schedule hasn't been finalized so I'm not sure which shows I will be covering but I do know of 2 of them and I'm super excited. (Make sure you're following my Instagram for the most up to date photos and information!)

The second to last station on the CND Art Walk was the Education Station. This one is definitely the most important because CND is all about education - both initial and continuing. Being a nail fanatic (not a professional), I'm not eligible for the perks but if you have your license or you know of a salon that wants to become SHELLAC Certified, send them to the CND website ASAP! After you take your SHELLAC Course, there are "Next Steps" to complete in order to get your Welcoming Kit.

The last station in the CND Art Walk is definitely the best. It's Jan Arnold!

This isn't my first time seeing Jan. We had a 1-1 sit down interview in 2013 and one of the first things she asked me was "Why don't you have your nail license?" Especially with the CND Nail Scholarship Program available, I don't have any good excuses. I would love to go to school so that I can have the education behind my passion but that will have to wait for another day. I also got to see Jan last month at Cosmoprof for a fleeting moment. She hugged me like I was an old friend and we talked shop then too. Jan always has the most amazing manicures, so this time I needed to see what she was sporting.

This manicure is going on TWO WEEKS. Look how incredibly shiny and amazing it looks! Jan told me that while she loves short square nails (like what I normally wear), for her, she needs a more feminine almond shape and longer length to balance her short hair. "Short hair, long nails. Always. The almond shape does for the hands what the stiletto heel does for the legs." Jan stated. A timeless but elegant look, perfect for today's event.


On my own nails, I created a sponged gradient with VINYLUX

I started with a base of Powder My Nose which is a cream colored creme polish, then sponged on Rapture Blue and Lilac Longing. I added a few pieces of hexagonal glitter for sparkle before finishing with CND VINYLUX Weekly Top Coat.
Bit of a rookie mistake though. Because VINYLUX is designed to harden to the polish like a gel product, it squeezes out all the air in the polish... and essentially popped my glitter off. Educational Ambassador Michele told me that the trick is to apply the VINYLUX Weekly Top Coat, let dry 8.5 minutes, then use CND Super Shiney Top Coat (purple bottle) to apply the glitter. Lesson learned.

CND holds their #IHeartCND events across the country - be sure you're following the CND social networks for locations and dates!

You can purchase CND VINYLUX for $9.90 per bottle at select salons.

Join CND via their social media channels Twitter, Facebook, Instagram, Pinterest and YouTube.

Disclosure: The product[s] in this post was [were] provided to me by the company for consideration.  For more information, please read this post.