Showing posts with label nail art. Show all posts

#31DC2013 Day 3: Yellow Nails


Cutting it close today, I know. But I had a glorious 3 hour nap as it rained, so sorry, not sorry.

Today's challenge was yellow nails, and this was a challenge for me because I typically HATE yellow polish.  Like really hate.  First I thought about glitter, then cremes, then golds and then I just got distracted.

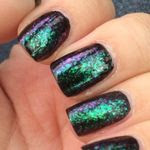
When I was searching my boxes, I immediately came across Color Club Daisy Does It, which is a yellow microglitter shimmer in a slightly yellow base. However, it was just too sheer so then I found my Ruby Wing Birdie and put down 2 coats of that.  (I started my manicure with Cult Nails Get It On.) Then I added 2 coats of Daisy Does It. But I didn't feel complete so on my ring finger, I added one coat of Sation Twinkle, Twinkle Big Star and one more coat of Daisy Does It to make the glitter look more yellow than gold.  Add Cult Nails Wicked Fast top coat and DONE.


I actually really, REALLY liked this manicure! I didn't get as much glitter as I hoped out of my Sation bottle. The larger rainbow reflective pieces sank towards the sides of my nails and all that really stood out was the red glitter, but I can't wait to layer it over white and see it all pop out. I even considered wearing this look to work! It's just the right touch of glamour.

Disclosure: The product[s] in this post was [were] provided to me by the company for consideration.  For more information, please read this post.

#31DC2013 Day 2: Orange Nails


Happy Labor Day to all my USA friends! I literally spent the day doing labor, but what can you do.  Today's challenge was "orange nails" and I had a hard time finding an orange in my stash that I wanted to wear today!

I ended up going with the Jesse's Girl JulieG Beauty Guru as my base. This was part of the original JulieG launch before they got their own bottles.  I started with Cult Nails Get It on for my base coat, 2 coats of polish and Cult Nails Wicked Fast as my top coat.  Then I tried to get overly ambitious with my ORLY Instant Artist water-based paints in Crisp White. I'm one of the new Nail Art Society Nail Art Gurus and these ORLY Instant Artist water-based paints will be in the new box that is coming out. I promise to write more about that later - but I have to say it was really easy to use.

Day 2.


Trying to use my new point-and-shoot camera. It's a Canon PowerShot A4000. I bought this to replace my beloved PowerShot A2000 which broke on the bottom earlier this year.

I think every thing went well until I got to my pointer finger and then I got crazy and it was bad.  But hey, working on it just means I have somewhere to go up!

Disclosure: The product[s] in this post was [were] provided to me by the company for consideration.  For more information, please read this post.

#31DC2013 Day 1: Red Nails


Let me start by saying I got overambitious.

The first of the #31DC2013 is "Red Nails." I was thinking "Hey, I'll be cool - just paint my nails red." I'm still weaning into nail art, trying to stay cool about it all. But then I just got overly excited and was like "DO ALL THINGS."

I started with a base of Cult Nails Get It On. I always wear base coat, even if I'm wearing nothing else that day.  It helps protect my nails and they always look healthy.  (Note I said look, hah.)

Then I put on one coat of Layla Softouch 7 Queen Bourdeaux. This is a lovely firey red that dries to a matte look but as with all Layla Softouch polishes, a top coat will not make it shiny.

But then I was like - I need nail art. I grabbed my striping tape and made a couple of lines, and then a couple more and was like "HAH I made a hashtag."  I painted over my nail with Zoya Bobbi and then pulled the tape off.

Mistake #1: Not waiting long enough to pull the tape off.

So a little came off with the tape and then I realize my hashtag was off centered of the nail.  I used my top coat from Digital Nails hilariously nailed "Ain't Nobody Got Time For That" and looked back at my hands and said...

LET'S ADD RHINESTONES.

Back when I was really interested in making a custom rhinestone iPod case (ahem), I figured out that I could buy tons of rhinestones super cheap on eBay. So I did. And they have sat on my desk ever since.  I have literally only used them once

So back to the beginning. I got overambitious.  I also am using my really big DSLR to take photos, and since I haven't been blogging lately, it felt really bulky in my hands and then I couldn't get the right lighting.

Have you figured out that I'm stalling before showing you pictures? Then again, most people skip the writing and go straight FOR the pictures so without any more rambling.

Day 1.


Ta da. Or something. Well - challenges are all about improvement, so here's to improvement!

Disclosure: The product[s] in this post was [were] provided to me by the company for consideration.  For more information, please read this post.

#31DC2013 by Chalkboard Nails

Over the years, I have been inspired by, but never participated in, a 31/30 Day Challenge. This is where someone has created an editorial calendar for you to follow and it's been fun to watch different bloggers take their own spin on the challenge, whether it's creatively or through their inspirations or heck, it's just pretty.

In 2011, Chalkboard Nails and other nail enthusiasts participating in a 31 Day Challenge and she had so much fun that she repeated the challenge in 2012. (See her 2011 and 2012 round up posts.) Well, when you're successful at something, you keep it going, am I right?

Starting tomorrow is the #31DC2013 by Chalkboard Nails. You can read all the details on her blog but the gist is follow the image prompt, post on your own social media, blog, whatever, and ENJOY! No real rules, you can post more than one per day, just have fun with it.


She has coined #31DC2013 so that you can search for all contributions - since Instagram, Facebook and Twitter all support hashtag searching, be sure to include it with your manicure.

I love the idea of trying this for my first nail challenge. Chalkboard Nails is super inspiring, both in her blogging and her blogging etiquette. (Yes, I did love her Twitter image so much that I was working on redoing my own Twitter icon but I haven't nearly gotten the time to finish it.)

Nail Candy "Love Letter"


If you've been reading PolishGalore for awhile, you know how bad I am at nail art, or more specifically nail pens. So when Nail Candy asked if I wanted to review their Love Letter collection, I did it more so I could see if the pens were going to be easier to work with than the others I've tried.

Nail Candy says they are unique because the polish is salon quality, and unlike others I've seen - has two ways to apply.  The first is their patented Micro-Tip and the second is a normal nail polish brush in case you want to use the color as a base. They are attached with a small ring and come with a cleaning pin for the micro-tip.

The colors don't have actual names but this collection had a white with hot pink, and a red with a Barbie pink. Unfortunately, this collection is no longer available on their website.

So the Micro-Tip is small - about the thickness of a business card.

Meanwhile the brush is a normal nail polish brush.

I decided to use the red/pink combo to draw a bit.
The trick is to squeeze the bottle instead of trying to push down on the pin tip. You can see that it drew very thin lines when needed (even if my hands are a little shaky. If you're into nail art, this is a pretty easy and simple way to get the look you want to achieve.

Nail Candy [Website | Facebook | Twitter] can be purchased on their website for $10 for 2 colors.

Disclosure: The product[s] in this post was [were] provided to me by the company for consideration.  For more information, please read this post.

China Glaze Wait Teal You See!


This morning I told you about the new China Glaze Ombré sets - now I have the above to show you!  


I was surprised to see that these were full sized bottles - I knew that from the press release but the packaging just made the bottles seem so small in my hand.


The back of the package shows you a step by step of how to do it.


The ten pull apart 6 sided sponges.  Each one is slightly larger than a quarter.


First I painted my nail with White on White and then I decided to put my colors on a sandwich bag for easy clean up.  


RAWR MESSY SPONGE TIME. Now I think I needed more of the Turned Up Turquoise on my sponge because it just doesn't work as well for my eyes. Also you see how bumpy my sponge is?


Top coat that stuff.  Yep - it helps smooth out the spongy look... well, kinda.


I used my default e.l.f. Professional Concealer brush for cleanup.  They only cost $1 and are so awesome at cleaning up my cuticles.

The China Glaze Ombré sets are available for a limited time at Sally's Beauty Supply for $13.

Disclosure: The product[s] in this post was [were] provided to me by the company for consideration.  For more information, please read this post.

Layla Caviar 10 Mambo

2013 is all about texture and microbeads or "caviar" is part of that rage. The concept is fairly simple - apply beads to a wet coat of polish and seal (or don't - I didn't!).

I used a base coat of Layla Softouch 9 "Aqua Zen" which is a pretty turquoise and then I poured the C-10 "Mambo" microbeads over a small bowl to catch the extra. Layla says not to seal with a top coat, so I decided not to. The photo above is right after I applied the microbeads. I lightly pressed them down into my nail and went to bed.


Sorry for the ridiculously out of focus shot. Overnight, the beads seemed to change colors! Instead of all being teal, now some were teal and silver. You can also see the tip lost pretty much all its beads in a solid line.


This is after lunch, just going about my daily routine. Quite a bit of lost beads but hey, the patterns looks cool!


This is 12 hours later - you can see that I lost about 50% of the beads. Now my day job consists of being a mom and a front desk secretary, so... take that how you will. I'd like to try again with top coat in the future but for me, this is definitely an accent nail look - not a full manicure look. I used regular nail polish remove to take the beads and polish off which meant that they were not reusable for me.

Furthermore the price point is a little high for me. When the caviar craze first started, I bought a package of colored microbeads from JoAnn's "Reflections" for $10. It contained 6 different colors so ... 

Layla Caviar Effect ranges between $10-$13 depending on the retailer.

Layla Cosmetics is distributed to the US through the Luxcon Group who has a Facebook Page to several online websites including Ninja PolishZappos, AVEYOU, Brigette's Boutique, Amazon, and Drugstore.  It is also available at Ulta.


Disclosure: The product[s] in this post was [were] provided to me by the company for consideration.  For more information, please read this post.

Recent NOTDs

If you follow me on Instagram, then I totally apologize for the repeat photos but I thought I'd share a few NOTD polishes I've been wearing lately!

Starting with some naked nails:

1 October
10 October
27 November

And now some color!

Sation Diamond Diggin' Diva

Color Club Harp On It
Layla Softouch
Ruby Wing Sand Dune (shade on left, sun on right(
Jelly sandwich of Cult Nails Bitten & OPI Servin' Up Sparkle
Cult Nails Disciplined with Jindie Nails Tried & True
China Glaze Glistening Snow

It's been fun wearing nail polish again!  I hadn't been wearing full manicures lately and missed it.

China Glaze Real Nail Polish Appliques

Image Courtesy of China Glaze

While I was at Cosmoprof this summer, I got to see the China Glaze Real Nail Polish Appliques which are on the trend of instant manicure wraps you've been seeing all year.

Now, if you've watched PolishGalore for awhile, you've seen that I absolutely suck at applying these things.  I never seem to have enough patience to properly align and the biggest part - file off properly.  Either way, Nail Polish Canada was kind enough to send me my favorite design to try - Shake Your Tail Feathers - a peacock inspired blues, purples and greens with a white base.

Shake Your Tail Feathers
Image Courtesy of China Glaze

The strips are sealed in an airtight package because it is real nail polish and exposing it to air will dry the strips out.  This also means that your package is pretty much good for one time use.

Each nail is the same design which is kind of neat - the top has a rounded edge, the strip part where you hold is squared off.  So if you have squared cuticles, well you're going to have problems.  China Glaze also recommends warming your hands before applying but my hands are always warm so I didn't do any other prep work.

This is the hardest part for me - finding the one that is right for your nail.  At this point, there is still plastic covering the sticky part of the applique, so you can't really bend the sticker to form around your nail.

Also enclosed in your package is a mini orange stick and a file to "cut off" the excess.

If you don't saw off the excess at the right angle, it's going to tear.  Like I did above.  Additionally, it's best if your nails have some length so you can kind of tuck the applique under your free edge.

Yeah that whole above "fitting your applique to the nail"?  Fail on my part.

The directions recommend using a top coat so I brushed a coat of China Glaze Fast Forward on top.  My bottle of Fast Forward is the most chemically foul smelling thing EVER.  I seriously don't know why I still have it.  I want to be bad and add lavender oil to it or something (don't do this).

While pretty, this stuff won't last on me more than a few hours.  I kept getting hair stuck under the applique because I didn't press down hard enough and I just need to practice about 234920347 more times to get nail art appliques or stickers to actually sit right.

Sadly, I cannot find my paper to show removal instructions.  As this is real nail polish, I would assume acetone-based polish remover would did it.  I was a terrible person and peeled mine off.  Don't be like me.

You can purchase these China Glaze Real Nail Polish Appliques from Nail Polish Canada from $9 to $11 (depends on the design).  There are 16 nail appliques in each package, the orange stick, file & instructions.  They are reported to last 7 days.

Many thank yous to Nail Polish Canada for their kindness in letting me test these out!

Disclosure: The product[s] in this post was [were] provided to me by the company for consideration.  For more information, please read this post.

NOTD: 15 September 2012

I was so in love with my Sation Blue Sky's The Limit manicure that I had to keep wearing it but I decided to add a little spice to it, with Cover Band Sticks 'n Stones available at Ninja Polish (currently out of stock).


My terrible right hand - I had 3 broken nails (thumb, index, middle), and a super long ring finger.


My polish matched my cardigan!

Love this shot - the polish, the cardigan, the negative space...

My normal looking left hand before I broke a nail and went back to nubbins.

The picture that started it all.


Disclosure: The product[s] in this post was [were] provided to me by the company for consideration.  For more information, please read this post.