Showing posts with label yellow. Show all posts

Jesse's Girl Sunstone

Today's Eye Dust from Jesse's Girl is Sunstone, a light brown yellow combination that is just kind of here for me.  It's very close to my skin color so I'm not sure how much I'd use it personally, but it is a good basic color.


This is without primer but it still has good coverage and opacity.


Jesse's Girl sells for $4.99 a piece online or at Rite Aid stores. You can visit Jesse's Girl on their website, Like them on Facebook and Follow them on Twitter.

Disclosure: The product[s] in this post was [were] provided to me using store credit for external work I provided.  For more information, please read this post.

Jesse's Girl Kiwi Rose

Photo Courtesy of Jesse's Girl Cosmetics
A few months ago, I was given the opportunity to help Jesse's Girl Cosmetics with their nail polish line, and in return for my work, I was offered store credit.  I decided to take my store credit and purchase the Eye Dust - A Collection - 28 shades in all.  All come sealed in a 2.5 gram pan with a sifter insert (note to self, I'm still learning how to use sifters properly) and a label that unfortunately has to be destroyed in order to open the container.  As you can see, the top lid has the company's logo and the bottom of the container has the ingredients list.


Today I'm testing out Kiwi Rose - Product 80580.  It's a light yellow with green flash, a lot like their nail polish Fire Fly.


This swatch was just the sifter insert removed and placed on my arm, no primer was used.
In the sun, you can see how it has a strong yellow glitter flash to it.


Turned to the side, you can start to see a bit of green in the glitter (obviously not green grass in this picture... it's over 100 degrees right now!).


In the shade, you can see the light yellow base.


To show the opacity of one pass of this product, here's indoors with the flash.  You can see that it does carry quite a bit of glitter and can look very yellow/green which is a great accent color (any time, if you ask me!)


I have 27 more shades here and some of them make me DROOL, so hope you like this little new feature of me finally going through all my eyeshadow/pigments!  I'm hoping to add another spreadsheet soon to my site, so you can easily go through those as well.  :)


Jesse's Girl sells for $4.99 a piece online or at Rite Aid stores. You can visit Jesse's Girl on their website, Like them on Facebook and Follow them on Twitter.

Disclosure: The product[s] in this post was [were] provided to me using store credit for external work I provided.  For more information, please read this post.

China Glaze Cracked Medallion

I decided to grab another Metallic Crackle from the Crackle Glaze - China Glaze that will be released this summer - this is Cracked Medallion, a "bold bronze".  My high school colors were black and gold so I thought this would go great until I realized that no, this is bronze, not gold, haha.


Loads of shimmer in this one.  I layered this right over my earlier Liquid Leather manicure and added a top coat of Seche Vite.


Here in the shade, it's really pretty - I'm actually super happy with this color.  I need to compare it to the Tarnished Gold that was also released in this collection - I can't wait until I get back into my comparisons :]


Indoors with the flash - crazy!


I haven't seen a bronze anywhere else out there - have you?


China Glaze can be found online through several etailers, including my favorite Head2Toe BeautySally's Beauty Supply, and TransDesign.

Disclosure: The product[s] in this post was [were] provided to me by the company for consideration.  For more information, please read this post.

China Glaze Electric Pineapple

Here's something to confuse me.  Electric Pineapple from the China Glaze 2011 Summer Collection Island Escape is listed as a "high intensity creme based lime green."  This is definitely not lime green or maybe I just have weird limes?  If anything, I'd call this like ... dirty yellow?  I don't know what this is, but it's not neon and it's not green.  I used a base coat of Seche Natural, 3 coats of Electric Pineapple and a top of Seche Vite.  While I actually did love the color, the formula was a bit thin and I could see some bald spots on my nails.


Here in the sun you can see it's not exactly neon yellow but it is very highligher yellow (is there a difference?). The balding isn't as apparent here.


In the shade you can see a tiny bit of my nail (or maybe that's just me) on my middle and ring fingers.  Also you can see how this isn't a neon by any means.


Finally here indoors with the flash you can see the green tones (FINALLY) from this color.  I think a water marble of this and Papaya Punch would be a nice summer manicure (maybe?) and it's definitely a good creme to stamp/Konad over.


China Glaze can be found online through several etailers, including my favorite Head2Toe BeautySally's Beauty Supply, and TransDesign.

Disclosure: The product[s] in this post was [were] provided to me by the company for consideration.  For more information, please read this post.

China Glaze Black Mesh

Just like OPI Black Shatter, China Glaze has Black Mesh, a black crackle polish.  Like other shatter/crackle polishes, they do tend to get thick over time, but you can add a little bit of nail polish thinner to break up the clumps.  I decided to go over my Lighthouse from earlier.  On my ring and pinkie finger, I applied Black Mesh but was irritated at how watery the formula was.  Well, since this has been sitting on the shelf for a bit, I decided to cap it and shake the bottle and apply over my middle and index finger... MUCH better as you can see.


Watery = bad.  


Sorry the focus on this is off - not sure what happened.  So which is better?  Honestly, they both applied the same for me.  I know China Glaze Black Mesh has been hard to find in my area, but I've seen racks upon racks of OPI Black Shatter.  


China Glaze [official website] can be found online through several etailers, including my favorite Head2Toe Beauty [official website], Sally's Beauty Supply [official website] as well asTransDesign [official website].

Disclosure: The product[s] in this post was [were] provided to me by the company for consideration.  For more information, please read this post.

China Glaze Lighthouse

Once again going with "finals" and once again, here's a yellow... the final color from the China Glaze 2011 Spring "Anchors Away" collection is Lighthouse, which was a multi-dimensional bright yellow glass speck or glass fleck.  It actually reminded me a lot of OPI Simply Smash-ing! but Lighthouse is more yellow.


I used a base coat of Seche Natural, 2 coats of polish and a top of Seche Vite.  This is a bit of a messy polish because of all the glitter stuff packed in there.  I had to do quite a bit of cleanup and still missed some in my cuticles.


You can still see a bit of VNL but it's not too bad.


I do like this color in the shade but not enough to wear it alone... more on that later.


Finally I have the indoors with flash - you can really see the VNL here.  Thankfully there was no staining with this color (something I always worry about).  Nice color but not my favorite.


China Glaze [official website] can be found online through several etailers, including my favorite Head2Toe Beauty [official website], Sally's Beauty Supply [official website] as well asTransDesign [official website].

Disclosure: The product[s] in this post was [were] provided to me by the company for consideration.  For more information, please read this post.

FingerPaints Psychedelic Sunshine

Also from the Summer 2011 FingerPaints Peace, Love and Color collection is this yellow polish that has micro rainbow glitter called Psychedelic Sunshine.  Now, originally I was pretty much NOT interested in this because I'm not a big yellow fan, but after some buzz on Twitter, I was interested in trying it.  


I used a base of Seche Natural, 2 coats of Psychedelic Sunshine and a top coat of Seche Vite.  The formula was quite thick and gummy and that's why I have heard from others who tried it, so I decided to contact FingerPaints.


Their official statement was that the formula was made thicker to keep the microglitter suspended but you can add some polish thinner to make it easier to manage and it shouldn't affect the quality.  However, if you do add thinner, make sure you mix your polish well because the glitter will probably settle closer to the bottom.


Now I don't know if you're a shaker or a roller, but mixing well for me means a bit of both.  :)


I did NOT add thinner before taking these pictures, so you're dealing with some gumminess.  Also, it was cloudy out (boo!).


Eep sheertown.  I do not like sheer colors.  So what did I do?  Added a base coat of CND Brilliant White first.


You can really see the gumminess on my index finger.


I did take an indoor with flash picture before and after the base of CND.  First the before.


And now the after.
This really shows off the gumminess, but you can also see how much the color brightened up.  It did also swallow some of the glitter, so this was an interesting experiment for me.  I want to play with it some more because this has some amazing potential.


FingerPaints can be found in Sally's Beauty Supplies stores and online for $4.99 USD each.  They are a Sally's Beauty Supply exclusive brand, so you can follow Sally's on Twitter and like them on Facebook as well as follow their blog.

Disclosure: The product[s] in this post was [were] provided to me by the company for consideration.  For more information, please read this post.

Zoya Mitzi

Alright Mitzi... are you yellow or green?  Either way, you're bright, you're matte, and you're the last color in the Zoya modmattes LE collection.  This is also a mini bottle but a full size is available.  I did not use a base or top color (Zoya actually doesn't recommend it) and this is 3 coats.  Formula was nice on this color as well.


This is definitely a green-yellow-lime-lemonish color that I've been told is like OPI's Fiercely Fiona (which I own in a mini bottle).  It's quite unique to my collection, especially being a matte.


Here in the shade, I feel like I have lobster red hands.


And finally here inside with a flash, it almost looks tennis ball green - almost neon like.  Definitely a neat color!


Zoya [official website] can be purchased on their website for $8/bottle.

Disclosure: The product[s] in this post was [were] provided to me by the company for consideration.  For more information, please read this post.

China Glaze Mega Bite

Also from the Tronica collection is Mega Bite a goldish yellow.  I really didn't see the holo in this but it's also a cloudy day.  Boo!  I did not use a base or top coat and this is 2 coats of yellow.  I can say it was nice and opaque!  That's always fun.


Silly clouds.


Here is one under 6500K light.
Oh you yellows.  You slay me.


China Glaze [official website] can be found online through several etailers, including my favorite Head2Toe Beauty [official website], Sally's Beauty Supply [official website] as well asTransDesign [official website].

NOTD: 6 April 2011

I actually wore this over the weekend, but since I tend to write my posts in advance, I'm just now posting it.


Someone on Twitter had told me to try neons under shatter/crackle polish, so I thought I'd go one step further and skittle it too!  Even though there were many layers, this only took me about 10 minutes to create.


I started with a base of Seche Natural, and then added one coat of CND Brilliant White.  I let that dry and then added 3 coats of each neon - China Glaze Pool Party, China Glaze Sun Worshiper, China Glaze Yellow Polka Dot Bikini, China Glaze Kiwi Cool-Ada and China Glaze Towel Boy Toy.  On top of that went a layer of Seche Vite, then a layer of OPI Black Shatter and a final layer of Seche Vite on top.  Phew!  My CND is a basic colour shade, all the China Glazes are from the Poolside 2010 collection, and Black Shatter is apart of the OPI Shatter Collection 2011.


Sun:


Shade:


Indoors with flash:


Indoors with web camera (and both hands!)


I seriously loved this manicure - I couldn't stop staring at my hands.  It gave me the courage to Skittle (wear a different color on each finger).  I really want to try the "ombre manicure" that I saw from All Lacquered Up's blog like a year and a half ago, haha.  Also seen here on The Diary of an Indy Grrl and here from Concrete and Nail Polish.  Fun times!


Disclosure: The product[s] in this post was [were] provided to me by the company for consideration.  For more information, please read this post.

OPI Black Shatter

Alright people, I'm going to be honest.  When I first heard about this "shatter/crackle" trend, I was miffed.  I feel like "shattered" nail polish resembles chipped nail polish which is such a no-no for me.  Now granted, I said I didn't like matte nail polish originally because it looked too much like a chalkboard, and now I'm in love with matte.  Would I feel the same about shatter/crackle nail polish?


THE ANSWER IS DUH!  YES!  THIS STUFF IS AWESOME!


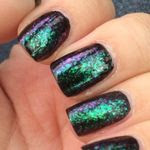
I took my existing manicure of Simply Smash-ing! and just painted one thin layer of Black Shatter over it.  In about 20 seconds, the polish completely separates, leaving you with a cracked effect.  I even took a video for you!


Here are some finished pictures in the sun and in the shade.

I did not use a top coat afterwards, but I recommend it if you like smooth nails (and I do).

OPI is available at Professional Salons, including Beauty Brands, Beauty First, Chatters, Dillard’s, JCPenney, Pure Beauty, Regis, Trade Secret, and Ulta, for $8.50 ($10.95 CAN) suggested retail for each Nail Lacquer. Please visit their website for details [official website].  

Disclosure: The product[s] in this post was [were] provided to me by the company for consideration.  For more information, please read this post.

OPI Simply Smash-ing!

Remember this post?  Now it's time to check it out!
Serena Williams is one of the only tennis players I can name, but not only is she an amazing player, she always has had some amazing nails!  I thought it was pretty neat that OPI paired with her for the Gram Slam collection which was this - Simply Smash-ing! and a Black Shatter (ooh, coming soon!).  It is a glitter without the grit, yellow-green leaning towards gold.  I'm tempted to call it glass fleck because it wore just like Zoya Sparkle's collection or the China Glaze Summer Days.  Removal was similar as well, leaving behind microglitter on my hands.


I used a base coat of OPI Natural Nail Base Coat, 2 coats of Simply Smash-ing! and a top of OPI Top Coat.
In the sun, you can see a few bald spots on my nails where the color didn't stick as well.  However, you can also see a bit of green in the polish.  I'm happy to say my nails did NOT stain after application - always a fear of mine.


Indirect sun picture - again you can see the smooth application with glitter but no grit of glitter.  I do love the OPI Pro-Wide brush - it helps get the polish in one stroke instead of 4 or 5 mini strokes.


Finally - shade.  You can really see the olive greenish coming out now.  I don't think this color flatters me that well, but when you add the Black Shatter... well let's just say it spices things up!


OPI is available at Professional Salons, including Beauty Brands, Beauty First, Chatters, Dillard’s, JCPenney, Pure Beauty, Regis, Trade Secret, and Ulta, for $8.50 ($10.95 CAN) suggested retail for each Nail Lacquer. Please visit their website for details [official website].  

Disclosure: The product[s] in this post was [were] provided to me by the company for consideration.  For more information, please read this post.

Migi Nail Art Pens

L-R: Hot Pink, Fire Red, Neon Orange, Lemon, Kelly Green, Royal Blue, Deep Purple, Magenta
One thing you haven't seen on PolishGalore is nail art - why?  Because I'm terrible at it.  I could never figure out how to effectively use a dotting tool or striper, and trying to put some kind of tape on my nails?  Forget it.  I do not have the most steady hands and the one paint pen I picked up required a tip that you pressed down first to get the paint flowing and it was just super messy, not to mention always scratched my manicure.


So when I was asked if I wanted to review Migi Nail Art pens, I was interested but super skeptical, not in the product, but in my abilities.  By a shipping accident, I received the entire White Collection #101 (available for $24.99) as well as the White single pen.  Each pen contains a 0.16 fl oz (4.8 mL) plastic bottle of polish with a threaded end.  If you unscrew the cap, it's a normal nail polish brush.


Additionally if you pull the cap off directly, it's a paint pen point.  I have a bead of paint already shown on this image, but that doesn't appear normally.
Unlike the other paint pens I've tried, you do NOT push down on the metal point - instead you squeeze the plastic nail polish container.  I found it helpful to get the first "drop" out and wipe it on a cotton pad, then use the actual pen.


I used a base coat of Seche Natural and on my index, ring and pinkie finger I used 2 coats of the base color.  Now be gentle, this is my first attempt at nail art!  Sun picture!
My middle finger does not have a base color - just simple "lemon" polish stripes.


Shade picture and thumb!

The white polish has a bit of a reddish/pink shimmer to it - it's very subtle but it's there.  I was really proud of my pinkie nail - I started trying to make a swirl but screwed up and decided to make a little flower instead.


The hard part for me was sealing my art.  I did not wait long enough before using a top coat of Seche Vite and my first attempts smeared (I had a rainbow on one finger, a heart and a flower on another).  This second time I waited a little longer and it seemed to work without smearing.  Migi sells its own top coat which I would hope works better with their product but again maybe it's just that I'm not patient enough.  ^_^


I did find that the colors as base colors were just slightly too sheer for me to wear alone.  I'm used to thick cremes BUT at the same time, you can see that the colors worked well as base colors.  I didn't have any problems with the formula at all - not runny like I originally thought it would be.  As paint pens, after that first bead of polish which I always squeezed out, I found it worked pretty well - I'm just trying to work on my steadiness as well as my control of the pen.  However, you can see how thin of a line it will draw as you can see on my middle finger.


Now remember that threaded end I mentioned?  The collection kit also contained these rings:

Screw them all together and what do you get?  Long pens!


Now, Migi has graciously given me another collection (Gold Collection #100) to give to a reader!  A $24.99 value, this contains 8 Fashion Colors each with its own brush and art pen in the follow colors: Purple, Aqua, Violet, Gold, White, Glitter Navy, Green and Orange, 4 Twist and Join Rings, 1 Design/Instruction Booklet and 1 Cleaning Pin (located inside the design booklet - you can also use it to help aid in designing).


One more thing - when you purchase any of their products, you can register on their website to get free* refills for US customers.  You pay $2.99 for shipping and processing and then choose any two colors you'd like - whether you need more of a color you already own or if you want to try out another color.  More information is available here.


This giveaway is available to all followers and you can earn more entries by the following methods:
(1) REQUIRED: Be a member of PolishGalore through Google Friend Connect. (What is GFC?)
(2) One extra entry: Follow Migi Nail Art on Blogger through Google Friend Connect.
(3) One extra entry: Follow me (Krystal) on Twitter.
(4) One extra entry: Follow Migi Nail Art on Twitter.
(5) One extra entry: Subscribe to Migi Nail Art on YouTube.
(6) One extra entry: "Like" Migi Nail Art on Facebook.


Please note that your information will never be shared with a 3rd Party Company, sold, or given out. 


This giveaway is now closed


Disclosure: The product[s] in this post was [were] provided to me by the company for consideration.  For more information, please read this post.