Eiiii thank you!
11.01.2010
I had over 14,000 blog views this month! That's 3,000 more than last month which just makes me so giddy! I'm still rounding up a few more prizes for my 600+ Followers Giveaway, and there are still a few people who haven't responded to my emails for winning my 500+ Readers Giveaway, so I may have to draw new winners. But overall, thank you!
Incoco Bling Bling

This post is a long time coming :P I was waiting until I was rocking more than just nubbins before I tested out the Incoco Dry Nail Appliques for myself. I received this awesome gift bag with Bling Bling, 24 Karats (that went in my 500+ Readers Giveaway), Jazz Blue (frost) and Lemon Fizz (neon!) This has been the year of the dry nail polish. I remember a few years ago when Avon came out with some dry polish, but I heard it was hard to apply, dry and brittle. Then we had Minx come out and that was all the rage. CND launched Shellac which is actual polish that is specially cured under a UV lamp to be just like dry polish. Claires has some nail type stickers out. Essence is launching nail stickers this month (I think, I can never find Essence products). And then we have Incoco. The biggest upside for me, is that you can purchase this in your local Walgreens... the others - not so much. (Maybe Claire's, but their nearest store is an hour away from me.) In addition, you can purchase Incoco strips online as well.
Because I was going on a small trip (YAY), I chose Bling Bling to apply. I waited until right before bed, because one thing I hate is not being able to move after nail polish application (even with Seche Vite!) so I don't smudge, dent or somehow else ruin my nails. Bling Bling is a silver base with almost a VNL with lots of multicolored glitter. This isn't a sticker, this is actual dry nail polish and contains a base and top coat in it. You're provided with 16 Double-Ended color strips but if your nails are short enough, you can use each strip twice (which is what I did). Incoco is big-3 free (no DBP, Formaldehyde or Toluene).
Incoco does have a nail polish scent to it, but it's not terrible by any means. The directions say for best results clean and buff nails, push back cuticles, start with your pinkie first and apply thumbs last. Let's just say I'm horrible with instructions as in - I didn't read them. I didn't even wash my hands first so I'm sure there are some oils left over, I did have half my nails buffed from last week, I didn't mess with my cuticles, and I applied my thumbs first.
First you need to choose a strip that fits the width of your nail. You can bend the dry strip before removing the plastic films, it's not going to break. Next, remove the plastic film and then remove the actual polish strip. Break off the tip that has the squared edge, then apply to your nail and smooth into place. I received a nail file and cuticle pusher with Bling Bling but I didn't find the nail file to be "sharp" enough so I actually used my nail from my other hand to remove the excess nail (also shown to be acceptable in the directions), and then filed off any corners with my crystal file. I did have some rookie mistakes - didn't pick a wide enough strip for one nail, didn't get all the way to my cuticle in another, but overall the process took less than 10 minutes and then I was done. No waiting for a top coat to dry, and I could immediately start writing this post.
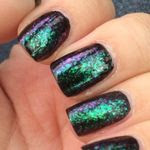
Despite being a glitter, Bling Bling did not have a grit to it (uh, yay!) but shined like a mirrored disco ball. It was very similar to China Glaze Nova in terms of bling, although I'd say Nova is a chunkier polish of course. Another awesome feature of Incoco is that the strips are thin, so there isn't any bulk to your nails. Picture time! Sun first:


Now some blur for a bling!

I'd consider myself to be pretty impatient and horrible with most things the first time around, but this was extremely an easy process. The strips were forgiving and even long after the strip was attached, I was still able to "pinch" off any excess that I had around my cuticles and remove it without peeling off the whole strip from my nail.
I was also super excited to see that in their trifold brochure, they had pictures of upcoming series - Nail Art, Chrome series, Matte series and Gold & Silver. I'm jumping out of my skin for the Nail Art... I'm horrible at nail art especially the wait time in drying.
Incoco ranges from $7.99-$8.99 online and I've seen it for up to $10 in stores. If you haven't tried it yet and want to now, for the next month, Incoco will offer PolishGalore readers 10% off their online purchase of Incoco at their Online Shop by adding the coupon code galore10 at check out. Additionally they are having an ongoing promotion of free shipping* for orders of $50 or more (*US only). For more Incoco videos, FAQs, product pictures and much more, you can visit their website. They also have a Twitter page available.
Disclosure: The product[s] in this post was [were] provided to me by the company for consideration. For more information, please read this post.
Zoya Mask
10.31.2010
Not going to lie, I'm not a fan of Halloween. In fact, we skipped it this year completely. Oops. (Okay, not oops... I lost 16 pounds this month and so I'm staying far, far away from candy.)
BUT I did have a Halloween manicure (to come!) and I did a mask for the Zoya Blog shopping spree!
I took some crafting scrapbooking paper and then took Zoya Nail Polish and used it to embellished the mask - Carrie Ann, Edyta and Julieanne in the swirls and leaves. Yay! Hah. The mask smelled like nail polish but I can deal.

Blogs of Note
Boo! Happy Halloween Sunday! Here are 3 more blogs for you.
 First today is Nails Beautiqued. Unlike most of the blogs I read, she is an actual licensed nail technician. She has a feature called "Blue Monday" where she features a new blue polish on Mondays. She has long nails with great cuticles if I do say so myself.
Next up is Never Too Much Glitter. This is another of my original blogs that I followed before I started Polish Galore. Most of her polishes (if not all) are frankened and she also has a Etsy shop where she sells fake nails with her designs and colors. She does live in Japan, so there will be extra for shipping. She uses fake nails herself that are short and slightly squared which I believe is the style in Japan, but don't quote me on that one.
Finally today is Phresh Mentality. She has short to medium nails and does feature a lot of nail art. Additionally, she does offer nail polish painting parties but she's located in the UK (Surrey/London area) so that's a bit out of the way for me personally.
Enjoy and don't eat too much candy!
China Glaze Mrs. Claus
10.30.2010

I used a base coat of Seche Natural, 2 coats of Mrs. Claus and a top of Seche Vite. I noted that while the first coat was quite sheer, the second coat went on well - although a bit thick. Maybe it's because I tried to make it thicker? Not sure. It reminded me a lot of the "Specialty" collection that came out last summer - almost like Pom Pom.


China Glaze [official website] can be found online through several etailers, including my favorite Head2Toe Beauty [official website], Sally's Beauty Supply [official website] as well asTransDesign [official website].
Disclosure: The product[s] in this post was [were] provided to me by the company for consideration. For more information, please read this post.
Subscribe to:
Posts (Atom)