Press Sample
I have to take some photos today, and I knew I wanted a cherry red creme since the photos are for professional needs and I'm not the photographer. Now it's not that I didn't want to go with an awesome neon or a crazy holographic, but I wanted something timeless, elegant and classic. After a little hunting, I found my LVX Crimson from the 2015 Winter/Resort collection.
I used a base coat of Duri Rejuvacote, 2 coats of polish and finished with Love, Angeline Topped With Love top coat. My nails are a little long right now and in need of some TLC but the formula for this polish was a dream. One thing I'm learning is to just get your first coat on and don't worry so much about opacity and use a second thin coat to get your evenness.
So when I look at my nails dead on, they look fantastic. Under a little harsher of a light in my box, you can see a bit of visible nail line almost leading towards the the polish being more of a jelly instead of a creme but I'm calling it a creme. Again, this is just a pretty classic red and definitely a good staple in anyone's collection. For those who are tracking like me, this is #63 in the LVX line.
LVX [Website | Facebook | Twitter | YouTube | Instagram] is available on their website. It is 10-free to include Toluene and Camphor, vegan and cruelty free. Use promo code POLISHGALORE for 20% off your purchase!
Disclosure:
The product[s] in this post was [were] provided to me by the company
for consideration. For more information, please read this post.
Press Sample
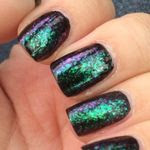
I was first introduced to CND back when the colours/effects line of polish were popular with their matchy bottles. I was so sad when they were discontinued, especially Blackjack, as it was my GO TO black creme. Then Shellac came out, and next was it's middle sister, Vinylux. Today I have the "little sister" in the line, Creative Play and that amazing bottle up there is called Dazzleberry.
Creative Play is a traditional three-step nail lacquer system (base, color, top coat) that comes in over 80 colors with 10 different finishes. They are 7-free and can be purchased in select salons worldwide. Also, check with your favorite manicurist, and they may offer Creative Play as one of their in-salon services. Prices vary, so unfortunately, I cannot give out accurate pricing as of press time.
For this manicure, I started with the CND Creative Play Base Coat. The base coat is creme in color but goes on the nail clear, and give almost a matte look to the nail. Then the color. I used 3 coats of Dazzleberry. The first coat was super sheer, almost a jelly. The second coat brought out more of the glitter and base color and I ended up doing a third thin coat to make sure I had complete opacity. I finished with CND Creative Play Top Coat which does NOT appear to be a quick dry top coat, so plan accordingly. Additionally, this polish dried a little bumpy (not gritty, not textured, just not smooth as glass) so I used two coats of top coat.

CND calls this color a microglitter which is pretty accurate. The base color is a fuchsia pink/purple combination and there is different quite a bit of blue microglitter to give a shimmer effect as well as some rainbow reflecting/holographic microglitters for extra shine. Granted, you won't be able to pick up every single color from the bottle on the nail but all that added in give this polish a unique dynamic.
Overall, I'm happy that CND brought back this "type" of nail products back for people like me who don't wear their polish longer than their work week. Vinylux is great for my super busy weeks where I can't change my polish as much as I want, and Shellac is fantastic for vacation when I know I can't change my polish when I want but Creative Play is where I will play (hah) the most.
Disclosure:
The product[s] in this post was [were] provided to me by the
company for consideration. For more information, please read this post.
Press Sample
I recently received a few Trust Fund Beauty polishes to try and I grabbed for Flirty & Dirty first. This deep dusty rose has a hint of shimmer to jazz it up. While not visible on the nail, it does give the polish an extra oomph over a creme.
I used a base coat of Duri Rejuvacote, 2 coats of polish and finished with Love, Angelina Topped With Love top coat. As you can semi-tell from the bottle shot, this polish has a long brush (think the old American Apparel bottles), so take the time to wipe a little extra off the brush. The formula was good, I almost got away with a one coat manicure but added a second coat to make sure I didn't have any visible nail lines before using my top coat.
I have a soft spot for dusty rose polishes. I love that they are office appropriate and almost a neutral for me but at the same time it's just very feminine and pretty. I can easily see myself grabbing for this polish over and over, no matter what the season is. It's a great palette cleanser as well against all the neons that the summer brings.
Flirty & Dirty is available for $15 on the Trust Fund Beauty website.
Trust Fund Beauty is available on their website. Join the conversation on Facebook, Twitter and Instagram.
Disclosure: The product[s] in this post was [were] provided to me by the company for consideration. For more information, please read this post.
All photos courtesy of Trust Fund Beauty
I heard about Trust Fund Beauty through social media ages ago (and by ages, I mean a couple of years) when I saw their sparkly polish called Boy Tears and put it on my birthday wish list. It's still on my list, waiting to come home to me, but today I have a little more information about the line itself.
Trust Fund Beauty was created by Samara Granofsky in memory of her late mother. Her mother had cancer and went through chemo which made her nails brittle and yellow so she wanted to wear nail polish to feel better of herself. Colors were limited back then and Samara's mother wanted a cool fashion forward brand, but couldn't find one.
Years after her mother's passing in February 2014, Samara launched Trust Fund Beauty. She combined her mother's want and their joint sense of humor. Trust Fund Beauty stands out in the crowd with sensuous colors and witty, unapologetic names like "Adult Content" and "Flirty & Dirty".
On the flip side, Trust Fund Beauty is vegan, cruelty free, 10-free status (and you thought Big 3 Free was a big deal!), safe for children and pets, GMO free - really we can keep going.
But wait, Trust Fund Beauty is also about lipsticks! Oh yes.
Super moisturizing, almost matte lipstick that is 100% vegan, cruelty free, paraben free and GMO free.
So now you have your Lips and your Tips matching.
Back to the nails - Trust Fund Beauty also makes a base coat, a top coat and a non-acetone nail polish remover. They also have box sets and a subscription box available for those who want a little more out of their purchase. OH and for those makeup lovers, there is a highlighter stick that you may want to grab on your way out the door.
Trust Fund Beauty is available on their website. Join the conversation on Facebook, Twitter and Instagram.
Press Sample
I love it when a company has kits available that give you everything you need to have a great manicure. Today I have a new favorite - the Dazzle Dry Mini Kit with High Velocity Red - a red with a slight violet shimmer that can make you conquer any Monday.
The Mini Kits come with a 0.25 fl oz vial of Nail Prep, a 0.17 fl oz/5 mL bottle of Base Coat, Color (High Velocity Red for this package) and Top Coat along with very detailed instructions.
First you are told to prep your nail. You can gently buff using a 240 or finer grit buffing block (I prefer my Tweezerman one) if you feel necessary. Next wipe each nail thoroughly with the Nail Prep. Your cotton pad needs to be wet/saturated, not just damp and some nails may need to be wiped twice. Surprisingly, this is NOT a dehydrator, like you find with gel polishes. Instead, it's infused with hydrolyzed protein, proVitamin B5 and calcium to strengthen your natural nails.
Next is to apply the Base Coat. Now, the very first instruction says that the Base Coat must be clear like pure water before using and if it's not, immerse the bottle (cap closed tightly) in warm to hot water for a few seconds.
Here is my Base Coat straight out of the package and next to the Top Coat to show that yeahhhhh I needed to get some water around that bottle. Now why do you have to do this? Because science.
This is after 30 seconds in warm to hot water (inside of a shot glass). Good enough.
So you're to apply the Base Coat generously and completely on the nail, dipping the brush into the bottle before each nail. You're also supposed to wrap the nail tip with Base Coat which is a good practice for ANY manicure. Finally, you're to apply TWO coats of Base Coat. That one is new on me, but I'll do it. I think it's because of all the extra vitamins and good stuff. You will need to wait 1-2 minutes before applying your color - basically when your nail looks matte or isn't sticky/feel wet to the touch. I had to wait a little closer to 4 minutes but I'm also in a whole bunch of sticky humidity here in South Texas.
Now for the color. On the first layer, you're told to just use little pressure and get it on your nail - don't go over the same area more than once. Wrap your tips, and ignore any uneven coverage on this layer. Hard one for me to do, but follow directions. Then after you've done all 10 nails (or waited the approximate time), go for your second coat and this time, you can even out but don't over brush and don't forget to wrap your tips. At this point, I was just a little surprised to see that this color appears to be matte or at least it was drying to a matte finish.
Finally, apply a generous layer of Top Coat and wrap the tips and wait 5 minutes for your polish to set. I used a small bead of Top Coat on the brush to make sure I was getting plenty on there. If you check out my Snapchat, I actually did a "wipe test" to see if my nails were really dry and THEY ACTUALLY WERE. I'm really pleasantly surprised.
Unfortunately, I'm not able to do a wear test this time but they do claim that the longest recorded chip-free wear with natural nails was 5 weeks. Granted, your body chemistry may be different but I am happy if I get 5 days out of nails.
I really like this color. It's a great go to color especially for the office for me. There's just something about red nails. I also really like the idea of the Mini Kit for friends, family, stocking stuffers. There are currently 29 different Mini Kits available on the Dazzle Dry website.
Dazzle Dry is available on their website and in select spas and salons across the USA. Join the conversation on social media with Facebook, Twitter, Instagram and YouTube.
As a bonus, I had a small sample of Dazzle Dry's Lemongrass Nail Polish Remover with Lemongrass and Clove Essential Oils. I have to say, A+ on the removal - no staining and it's a very nice smell... If you have Nail Butter, it's that same smell!
Disclosure:
The product[s] in this post was [were] provided to me by the company
for consideration. For more information, please read this post.